
Imagine cruising down the highway at 65 miles per hour, traffic slows ahead, and you firmly press your foot on the brake pedal. Instead of smooth, progressive deceleration, you feel an unsettling, rhythmic pushback vibrating right through your foot. Sometimes, the steering wheel shakes, or a low-frequency drone echoes through the cabin.
For decades, drivers and even professional mechanics have shrugged off this phenomenon with a familiar catchphrase: “Your brake rotors are warped.”
However, modern automotive engineering and tribology (the study of friction, lubrication, and wear) reveal that true rotor warping is exceptionally rare. The actual culprit behind that unsettling pedal feedback is a microscopic, highly destructive mechanical phenomenon known as Disc Thickness Variation (DTV).
If you want to permanently eliminate brake vibration, stop wasting money on premature rotor replacements, and master the mechanics of your vehicle’s stopping system, understanding DTV is essential. This comprehensive guide breaks down what DTV is, why it happens, how to diagnose it accurately, and how to fix it for good.
What is Disc Thickness Variation (DTV)? The Root Cause of Brake Pulsation
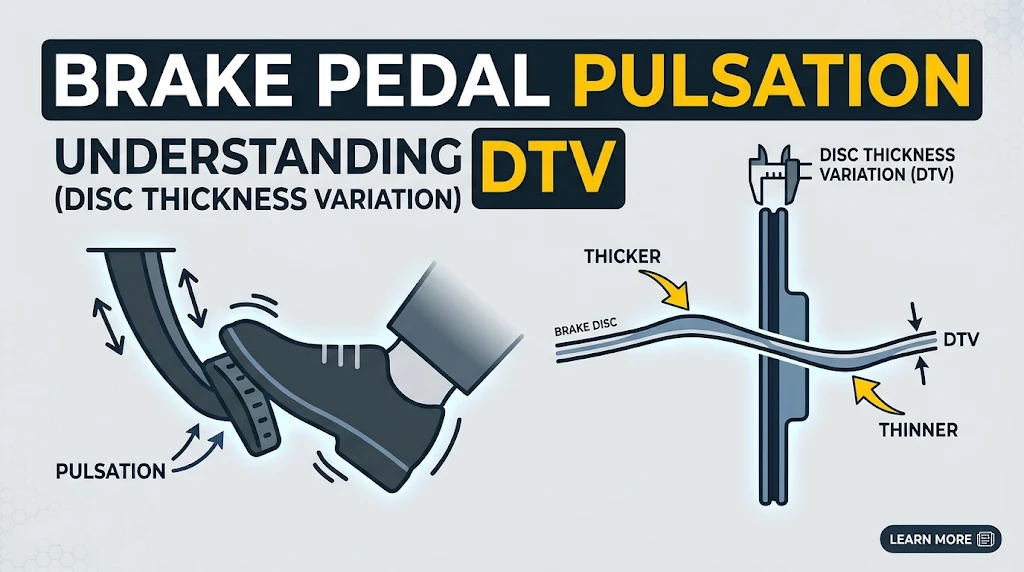
At its core, Disc Thickness Variation (DTV) refers to microscopic differences in thickness across the opposing friction faces of a brake rotor. When a brake rotor is manufactured or freshly machined, its thickness should be uniform down to a fraction of a thousandth of an inch (or microns).
When DTV develops, the rotor develops alternating thick and thin spots around its circumference. Even a microscopic variation of just 0.0005 inches (0.012 mm) is enough to be felt as a violent pulsation through the brake pedal.
The Microscopic Anatomy of a Brake Rotor
To understand how such a tiny variance causes such a dramatic physical response, you have to look at how a disc brake system operates. When you press the brake pedal, hydraulic pressure forces the brake caliper pistons to clamp the brake pads against both sides of the spinning iron rotor.
Pro Tip: Brake pads do not just squeeze a stationary disc; they float within a precision-calibrated hydraulic environment. Under normal conditions, the clearance between the pad and the rotor is microscopic—measured in thousands of an inch.
How Thickness Irregularities Translate to Pedal Feedback
As the wheel rotates, the rotor passes through the stationary brake pads. When a thick spot on the rotor reaches the pads, it physically forces the pads apart, pushing fluid back up through the brake hydraulic lines toward the master cylinder. Your foot feels this hydraulic pushback as a pulsation or kickback against the pedal.
Conversely, when a thin spot passes through, the hydraulic pressure pushes the pads back inward. This continuous cycling—happening dozens of times per second depending on vehicle speed—creates the rapid vibration known in the automotive industry as brake judder.
The Great Rotor Warping Myth vs. DTV Reality
One of the most persistent old wives’ tales in automotive repair is that intense heat causes gray cast iron brake rotors to physically “warp” out of round like a potato chip under normal operating conditions.
Metallurgical science tells a different story.
Why “Warped Rotors” is Usually a Misnomer
Gray cast iron has an extremely high thermal capacity and structural integrity at normal braking temperatures. For a rotor to physically warp from thermal stress alone, it would need to reach temperatures exceeding 1,200 degrees Fahrenheit (650 degrees Celsius)—hot enough to cause visible structural distortion, metallurgical breakdown, and total brake fade.
If your brakes are getting that hot during normal daily driving, you have a severely stuck caliper or an entirely different mechanical failure. In 99% of everyday driving scenarios, the rotor does not actually warp; rather, it develops uneven material deposits and localized wear patterns that create thickness variation.
Pad Material Transfer and Hot Spots (Brake Judder)
The primary driver of DTV is friction material transfer. When you brake heavily and come to a complete stop while keeping your foot planted firmly on the brake pedal, hot friction material from the brake pads can thermally bond to the hot rotor surface.
-
The Stagnant Clamping Effect: Holding hot pads against a stationary rotor leaves a patch of pad resin and friction compound welded to that exact spot on the iron disc.
-
Friction Coefficient Differential: The transferred pad material has a different friction coefficient than the raw cast iron.
-
The Wear Loop: Every time that patch passes the pads, it creates a localized spike in friction. This localized friction generates extreme heat in that specific spot, causing accelerated abrasive wear on the iron, which eventually carves a microscopic dip into the rotor—creating a permanent thickness variation.
Primary Causes of Disc Thickness Variation
Understanding how DTV forms in the first place allows you to change your driving habits and maintenance routines to prevent it from happening again. DTV is rarely caused by a single factor; it is usually the result of a compounding chain of mechanical and thermal events.
[Thermal Hot Spots / Heavy Braking]
       ↓
[Pad Material Transfer to Rotor]
       ↓
[Localized Friction & Uneven Wear]
       ↓
[Disc Thickness Variation (DTV)]
       ↓
[Vibration & Brake Pedal Pulsation]
1. Excessive Lateral Runout and Uneven Wear
Lateral runout occurs when a rotor wobbles slightly from side to side as it spins on the wheel hub. If a rotor has even 0.002 inches of runout, the high spot of the rotor will constantly brush against the brake pads even when you are not pressing the pedal.
-
The Result: This constant light rubbing generates continuous localized friction, creating uneven wear, thermal hot spots, and ultimately, DTV.
-
Root Causes: Worn wheel bearings, corroded wheel hub mounting surfaces, or improper installation.
2. Improper Wheel Torque and Hub Face Corrosion
One of the most common workshop mistakes occurs during tire rotations or brake jobs. If the wheel lug nuts are tightened unevenly, or if rust and debris are left trapped between the wheel hub and the rotor hat, the rotor will be pinched slightly out of alignment when the wheel is torqued down.
-
Example: If a technician uses an uncalibrated impact wrench to blast lug nuts on in a circular pattern rather than a star pattern, the uneven clamping force distorts the rotor mounting face. Over thousands of miles of heating and cooling cycles, this mechanical distortion translates into severe DTV.
3. Pad Imprinting and Chemical Staining During Heat Soak
As mentioned earlier, “pad imprinting” happens when a driver executes a high-speed stop (such as exiting a highway) and comes to a complete halt at a traffic light while keeping their foot heavy on the brake pedal.
-
The pads block heat dissipation in that specific contact patch.
-
The resin in the semi-metallic or ceramic pad bakes onto the iron surface.
-
Over time, moisture gets trapped under the pad imprint during parking, causing localized galvanic corrosion and pitting that accelerates thickness variation.
How to Diagnose DTV and Brake Pulsation Accurately
Before throwing parts at your vehicle, you need a systematic diagnostic procedure to confirm that DTV is indeed the source of your vibration.
The Steering Wheel Shake vs. Pedal Pulsation Test
Pay close attention to where you feel the vibration:
-
Brake Pedal Pulsation Only: If the pedal kicks back against your foot but the steering wheel remains rock steady, the issue is almost always rear brake DTV or minor front DTV.
-
Steering Wheel Shake + Pedal Pulsation: If the steering wheel oscillates violently back and forth alongside pedal feedback, the issue originates in the front steering and braking axle.
Measuring Rotor Thickness with a Micrometer
To definitively diagnose DTV, you cannot rely on visual inspection. You need an outside micrometer capable of measuring to the thousandth of an inch.
-
Clean the rotor braking surfaces thoroughly with brake cleaner and a wire brush.
-
Mark 6 to 8 equidistant points around the circumference of the rotor using a chalk marker.
-
Measure the rotor thickness at each marked point, remaining roughly half an inch inward from the outer edge.
-
Compare your measurements. If the variance between the thickest point and the thinnest point exceeds 0.0005 inches (0.013 mm), DTV is present, and the rotor must be serviced or replaced.
Checking Lateral Runout with a Dial Indicator
If your thickness measurements check out within spec, but you still experience pulsation, mount a dial indicator magnetically to the steering knuckle or suspension strut. Position the plunger perpendicular to the rotor face about 10mm from the outer edge and slowly rotate the hub. Total indicated reading (TIR) runout should generally not exceed 0.002 inches (0.05 mm).
Effective Solutions: Turning, Replacing, and Preventing DTV
Once DTV is confirmed, you have two primary options for restoration, paired with strict preventative practices.
Machining vs. Replacing Rotors: When Is It Safe?
-
Rotor Resurfacing (Turning): If the rotor has enough structural mass remaining above its casting Minimum Thickness Specification (stamped directly into the metal rotor hat), a machine shop or mechanic can mount the rotor on a brake lathe to shave down the high spots and restore parallel, uniform thickness.
-
Rotor Replacement: Modern rotors are manufactured with tighter casting tolerances and thinner profiles to reduce unsprung vehicle weight. If your rotors are close to minimum thickness, heavily rusted, or deeply scored, replacement is always the safer, more cost-effective long-term choice. Turning thin rotors removes their thermal capacity, making them warp and develop DTV even faster.
The Critical Importance of Proper Wheel Torquing
When installing wheels back onto the vehicle:
-
Ensure the wheel hub face and the inner rotor hat are polished down to bare metal using a wire wheel. Zero rust or debris should be trapped here.
-
Hand-thread all lug nuts.
-
Torque the lug nuts in a star pattern using a calibrated torque wrench set to factory specifications (never rely solely on an impact gun).
Bedding-In New Brake Pads and Rotors Correctly
The best way to prevent future DTV is to perform a proper bedding-in (burnishing) procedure immediately after installing new brakes. This deposits an even, micro-thin layer of friction material across the entire annular surface of the rotor.
Step-by-Step Bedding Procedure:
Find a safe, deserted stretch of road.
Accelerate the vehicle to 45 MPH.
Apply firm, moderate pressure to bring the vehicle down to about 10 MPH (do not come to a complete stop).
Drive for 1 mile without braking to allow airflow to cool the brakes.
Repeat this cycle 5 to 6 times. You may notice a faint chemical smell—this is normal as resins cure.
Drive normally for another 10 minutes without heavy braking to complete the thermal cycle.
Common Pitfalls and Mistakes to Avoid in Brake Service
Even seasoned DIYers can fall into traps that cause DTV to return within a few thousand miles. Avoid these frequent errors:
-
Skipping Slide Pin Maintenance: If your brake caliper slide pins are dry, seized, or corroded, the caliper cannot float evenly. One pad will drag continuously against the rotor, rapidly generating DTV. Always clean and lubricate slide pins with high-temperature silicone brake grease.
-
Using Low-Quality Budget Rotors: Cheap, unbranded economy rotors are often cast from inferior recycled scrap metal with inconsistent density. These soft irons are extremely vulnerable to thermal distortion and rapid DTV development. Stick to reputable OEM or high-grade aftermarket coated rotors.
-
Ignoring Hub Runout: If your wheel bearing or hub flange is bent or corroded, putting brand-new rotors on without cleaning or replacing the hub means the rotor will inherit that wobble instantly. Always check hub face runout before mounting new discs.
Frequently Asked Questions (FAQ)
Can bad brake pads cause disc thickness variation?
Yes. Uneven pad composition, uneven wear caused by stuck caliper pistons, or abrasive metallic fragments embedded in cheap friction material can gouge the rotor unevenly, directly causing DTV.
Will steering wheel vibration always mean DTV?
Not necessarily. While front DTV is the most common cause of steering wheel shake during braking, worn control arm bushings, loose tie rod ends, unbalanced tires, or warped wheel rims can also mimic or exacerbate braking vibration.
Is it safe to drive with brake pedal pulsation?
Mild pulsation is primarily an annoyance and a comfort issue, but severe DTV can compromise your stopping distance, overheat your brake fluid, and cause uneven pad wear that reduces overall braking efficiency. It should be repaired as soon as possible.
How can I prevent DTV from returning after a brake job?
Always clean the wheel hub mounting surfaces meticulously, use a torque wrench to tighten wheel lug nuts in a star pattern, perform a proper pad bedding procedure, and avoid riding your brakes down steep mountain descents (use lower gears for engine braking instead).
Conclusion & Call to Action
Brake pedal pulsation is more than just an annoying vibration—it is a physical warning sign that your vehicle’s friction system has lost its mechanical harmony. By moving past the outdated myth of “warped rotors” and understanding the true culprit—Disc Thickness Variation (DTV)—you are now equipped to diagnose, repair, and prevent brake judder like an expert.
Don’t let minor brake vibrations turn into a dangerous safety hazard or an expensive repair bill. Inspect your rotors, ensure proper installation torque, and commit to correct component care.
Have you recently experienced brake pulsation on your vehicle, or are you planning a DIY brake overhaul? Drop a comment below with your vehicle make and model, or share your troubleshooting questions with our community of mechanics and automotive enthusiasts!

Benjamin Grey is an automotive engineer and writer at Car Parts Advisor. With years of experience in the automotive industry, he shares expert advice on car parts, maintenance, and repairs to help car owners keep their vehicles running smoothly.


